This walkthrough illustrates the basic steps needed to complete a curved-arrow mechanism problem.
For further details, refer to the Help Page
which describes the function of all of the page controls, including special
tips on using the sketcher applet.
Click on each screenshot to advance to the next step.
| Step 01: Setting Up a Mechanism Problem |
Top |
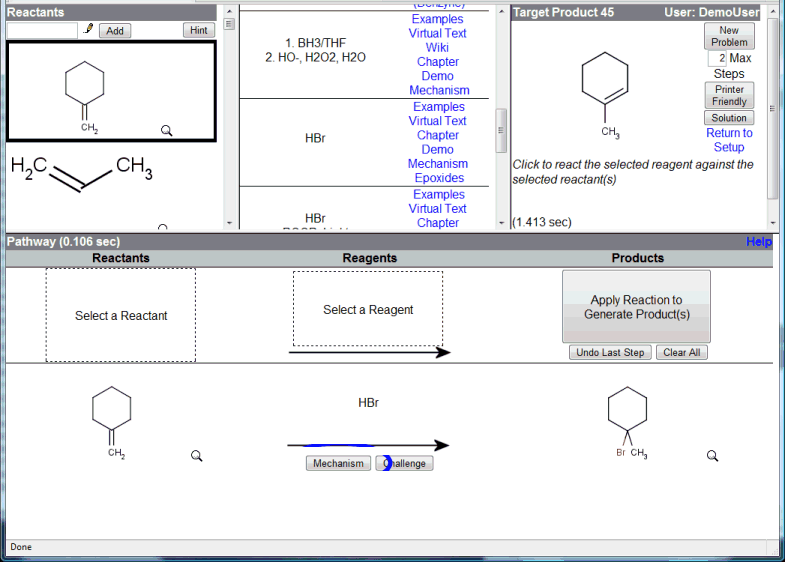 To setup a mechanism problem, access it from a direct problem link,
otherwise just click on the [Mechanism]
button that appears with any reaction predicted by the system,
such as the Reaction Drills or Synthesis Explorer interface.
To setup a mechanism problem, access it from a direct problem link,
otherwise just click on the [Mechanism]
button that appears with any reaction predicted by the system,
such as the Reaction Drills or Synthesis Explorer interface.
|
| Step 02: Review Mechanism Problem and Use Applet Select Function |
Top |
 The Mechanism Explorer interface should appear.
Your browser may request your permission to use
a Java applet. This is necessary for the arrow sketching function.
The Mechanism Explorer interface should appear.
Your browser may request your permission to use
a Java applet. This is necessary for the arrow sketching function.
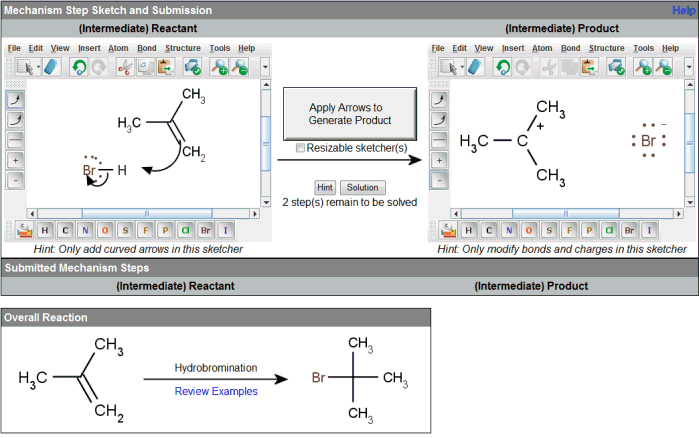
Shown below is the overall reaction you are to propose
a curved-arrow mechanism diagram for.
The sketcher is a 3rd party applet with many different, functions, but
we will only be interested in a few of them.
Click on the "Select" function in the reactant sketcher to rearrange the position
and orientation of the molecules to facilitate an easier time drawing
the mechanism arrows.
|
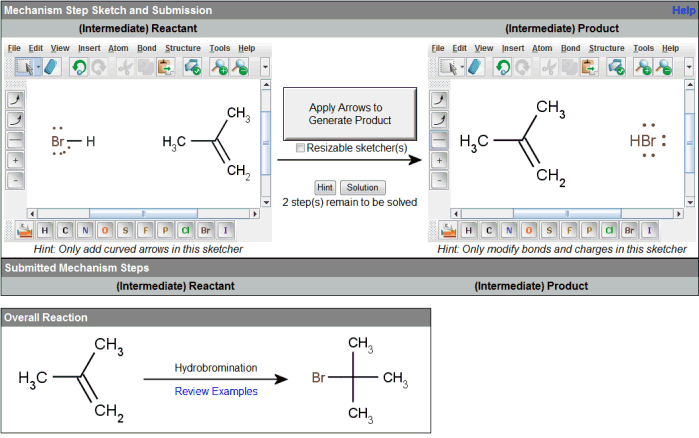
| Step 03: Select the Curved Arrow Tool |
Top |
 Select the curved arrow drawing tool from the toolbar.
Alternatively, you can access the tool from the
"Insert > Electron Flow" menu.
Select the curved arrow drawing tool from the toolbar.
Alternatively, you can access the tool from the
"Insert > Electron Flow" menu.
Note that below the usual curved arrow icon, is another icon
for drawing single-headed "fishhook" arrows for drawing
free-radical reactions with the movement of single electrons.
|
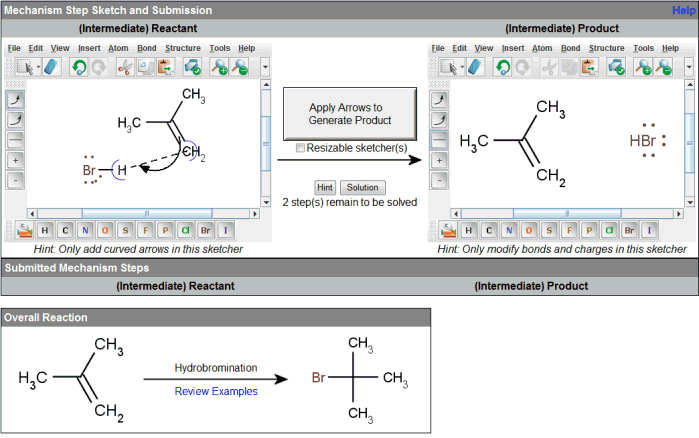
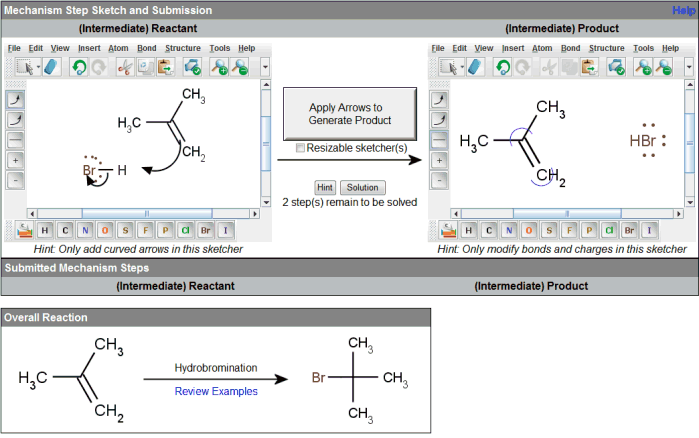
| Step 04: Select the Electron Flow Source |
Top |
 Mouse over and click on the source of the intended electron flow arrow,
in this case, the π bond of the alkene.
Mouse over and click on the source of the intended electron flow arrow,
in this case, the π bond of the alkene.
The electron flow source, will always either be a bond
or an atom (actually representing a lone pair or free radical
on the atom).
Before clicking, verify you are pointing at the correct target
by looking for the blue semi-circles which should flank
the bond you are selecting.
|
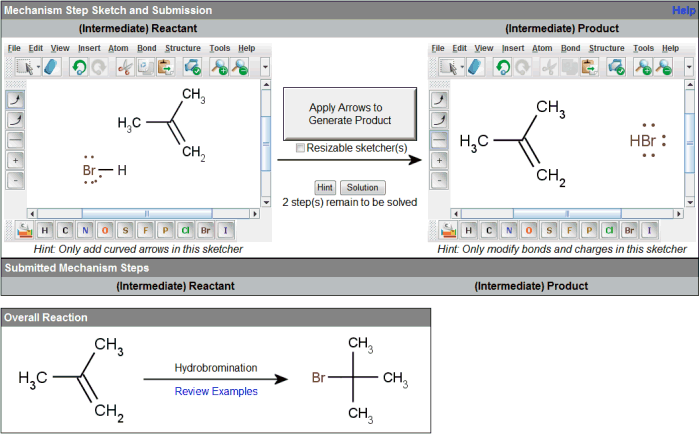
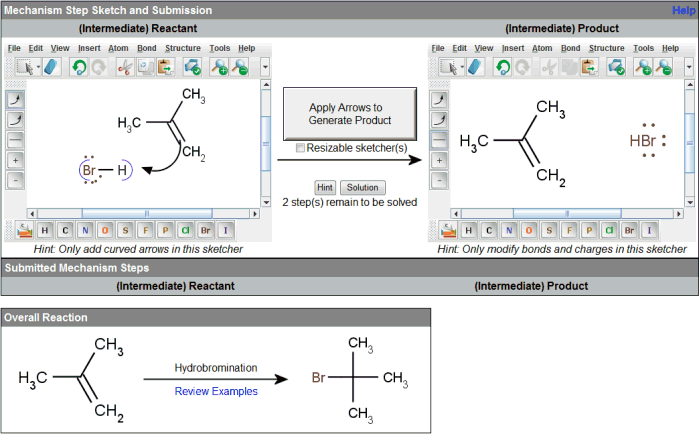
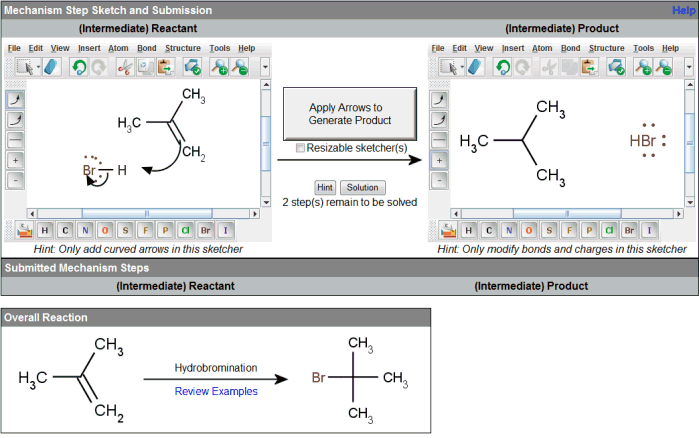
| Step 05: Select Target of the Electron Flow |
Top |
 Now that the electron source has been selected,
select the target of the electron flow.
In this case, we want to select the H atom
on the HBr molecule, but in general the target for
electron flows in the sketcher is the space
where a new bond will be formed after the
mechanism step completes.
Now that the electron source has been selected,
select the target of the electron flow.
In this case, we want to select the H atom
on the HBr molecule, but in general the target for
electron flows in the sketcher is the space
where a new bond will be formed after the
mechanism step completes.
Be careful, when the source of an electron flow is a bond,
selecting the target is tricky because we must specify
the "polarity" of the source bond. In particular...
Click in the space between the atoms where a new
bond will form. Before clicking, verify you have the
correct target selected by checking for the blue semi-circles
which should flank the atoms of the bond to be formed.
|
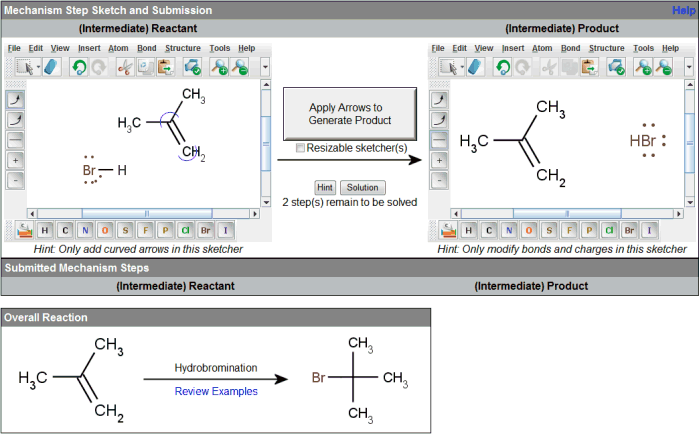
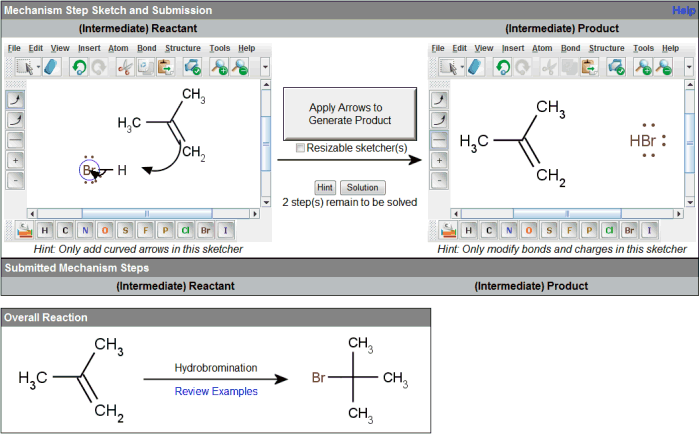
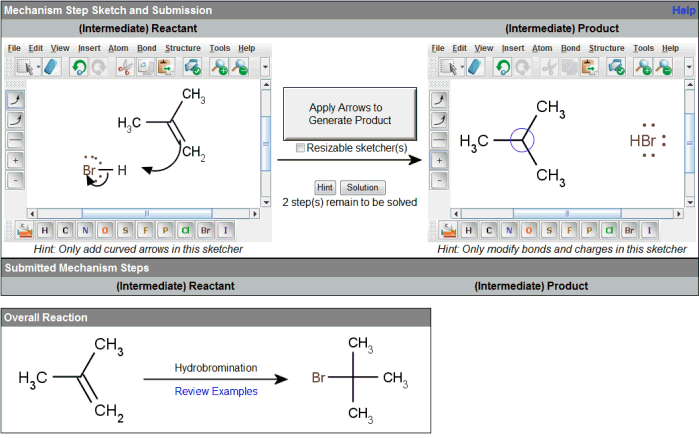
| Step 06: Select Source for the Next Electron Flow |
Top |
 This mechanism step requires another electron flow arrow for completion.
Click on the source of this next arrow, which is the
bond between the HBr atoms. Don't forget to verify
your selection with the blue semi-circles.
|
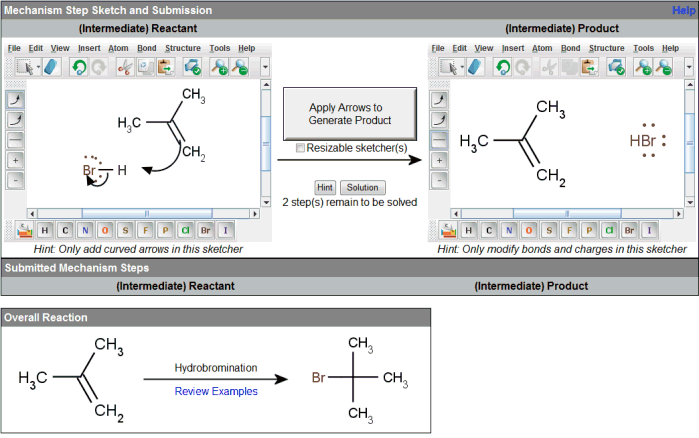
| Step 07: Select Target for the Next Electron Flow |
Top |
 Click on the target of this arrow, which is the Br atom.
|
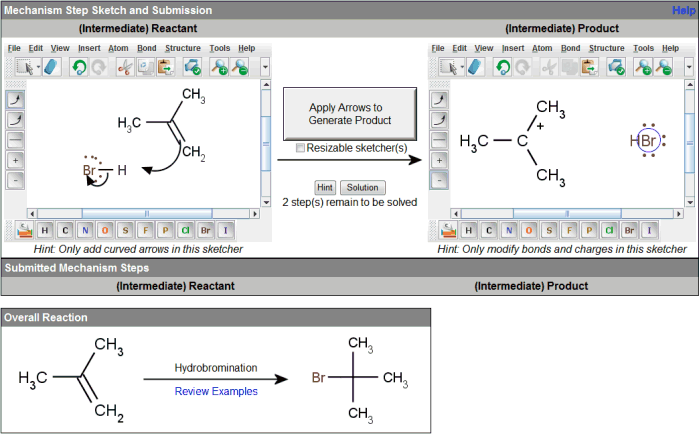
| Step 08: Select Bond Modifier in Product Sketcher |
Top |
 The reactant side of mechanism step is complete.
Depending on your instructor's problem settings, there may not be a product sketcher
applet on the right, in which case you may immediately click on "Apply Arrows..."
to continue to the next mechanism step.
If there is a product sketcher applet on the right, then
we need to modify the product side to match the expected resulting structure.
Select the Bond Modification tool from the product sketcher.
|
| Step 09: Create / Delete / Modify Bonds |
Top |
 Use the Bond Modification tool to create, delete, or otherwise modify the bond
orders in the product sketcher to match the intended target structure.
Use the Bond Modification tool to create, delete, or otherwise modify the bond
orders in the product sketcher to match the intended target structure.
|
| Step 10: Select the (+) Formal Charge Modifier |
Top |
 Now that the basic bond structure in the product sketcher is correct, we need to correct
the formal charges in the diagram. This can be done by first selecting
the (+) Formal Charge Modifier tool.
Now that the basic bond structure in the product sketcher is correct, we need to correct
the formal charges in the diagram. This can be done by first selecting
the (+) Formal Charge Modifier tool.
(Alternatively, you can "Right-Click > Charge" the respective atoms,
or "Right-Click > Radical > Monovalent" for radical reactions.)
|
| Step 11: Apply the (+) Formal Charge Modifier |
Top |
 Click on the central carbon to convert it into a carbo-cation.
|
| Step 12: Select the (-) Formal Charge Modifier |
Top |
 Select the (-) Formal Charge Modifier tool. Again, an alternative
is to just "Right-Click > Charge" the respective atoms.
Select the (-) Formal Charge Modifier tool. Again, an alternative
is to just "Right-Click > Charge" the respective atoms.
|
| Step 13: Apply the (-) Formal Charge Modification |
Top |
 Click on the Br atom to convert it to a bromide anion.
|
| Step 14: Apply Arrows to Generate Product |
Top |
 Once you believe the mechanism step diagram is complete,
Click on the "Apply Arrows..." button
to submit your diagram(s).
|
| Step 15: Review Submission and Select the Curved Arrow Drawing Tool |
Top |
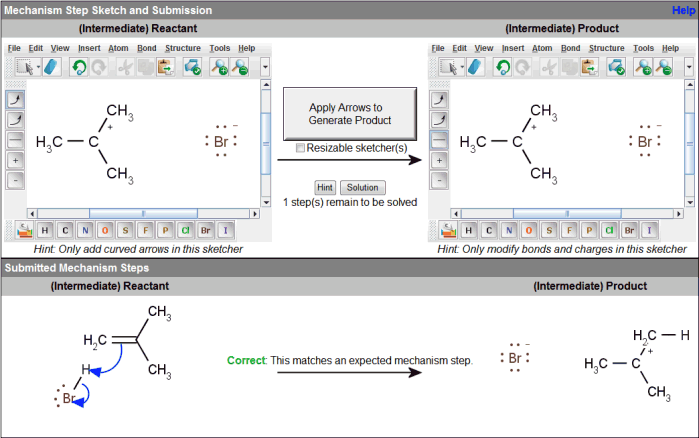 Below should be shown the mechanism step you just submitted.
The system should provide feedback as to whether your submission matched any expected steps.
Below should be shown the mechanism step you just submitted.
The system should provide feedback as to whether your submission matched any expected steps.
If your submission was correct, then the next step in the
mechanism should already be prepped in the sketcher boxes.
Click on the curved arrow drawing tool from the toolbar.
|
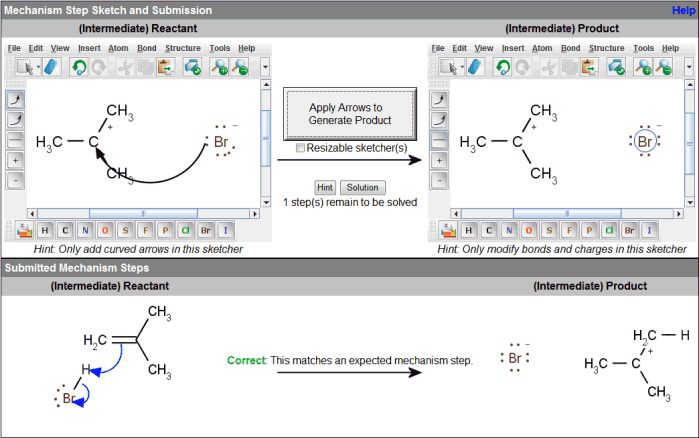
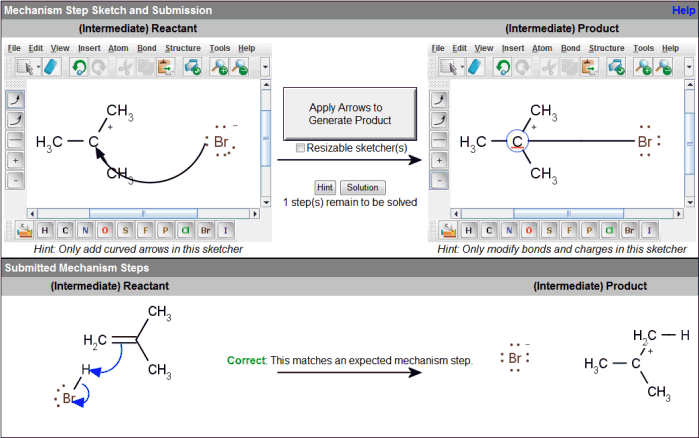
| Step 16: Select Source of the Electron Flow Arrow |
Top |
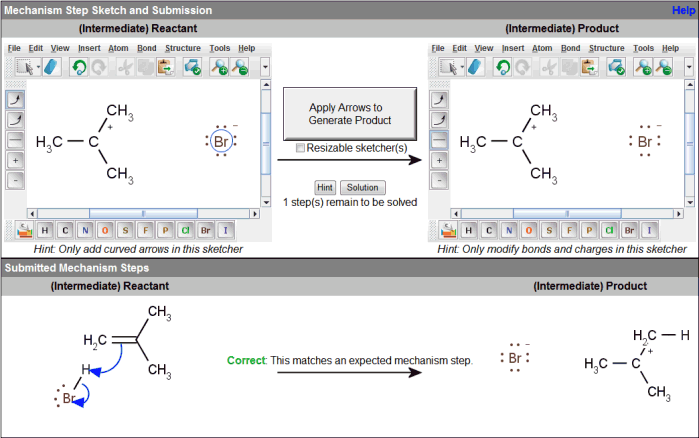 Mouse over and click on the source of the electron flow arrow for this mechanism step.
In this case, the Br- atom (actually representative of the lone pairs
on the atom, not the atom itself).
Mouse over and click on the source of the electron flow arrow for this mechanism step.
In this case, the Br- atom (actually representative of the lone pairs
on the atom, not the atom itself).
|
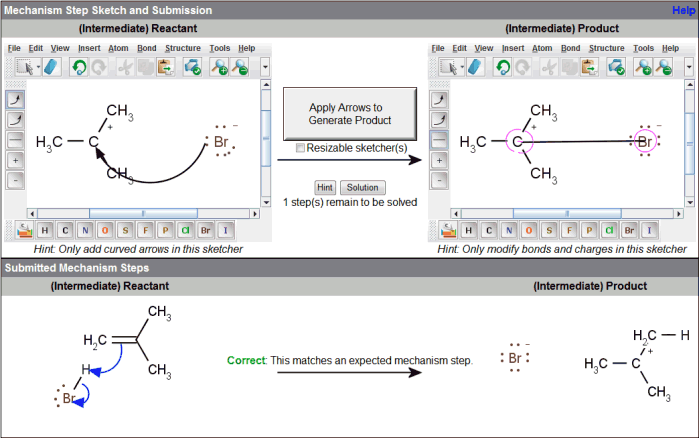
| Step 17: Select Target for Electron Flow Arrow |
Top |
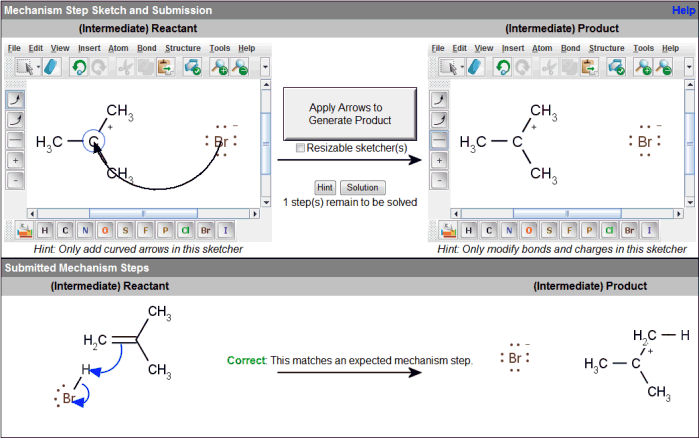 Click on the target for the electron flow arrow,
in this case the carbocation.
Click on the target for the electron flow arrow,
in this case the carbocation.
When the source of an electron flow is an atom (rather than a bond),
choosing a target is much simpler. Just click directly on the
target atom, or you can still click in the space between
the source and target atom. In either case, remember to use
the blue semi-circles to verify your selection.
|
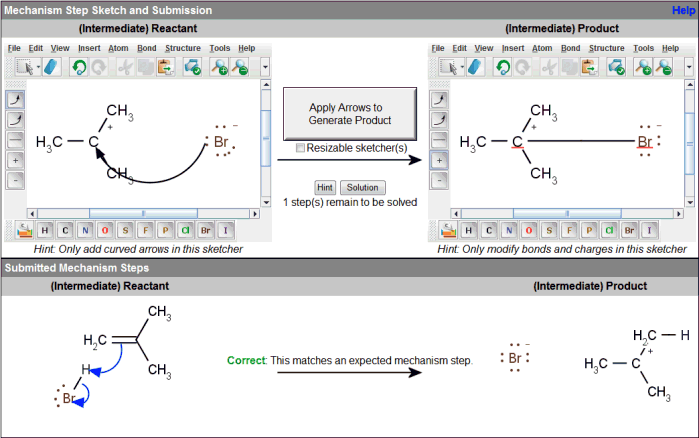
| Step 18: Select the Bond Modifier Tool |
Top |
 The reactant side of this mechanism step is now complete.
Select the Bond Modifier tool in the product sketcher
to prepare to modify the structure to that of the expected product.
|
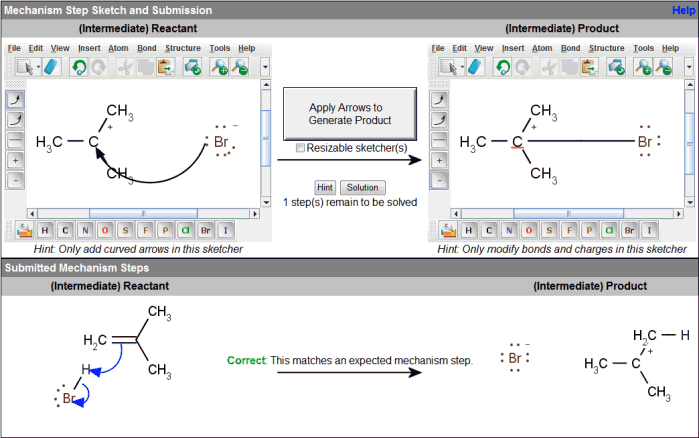
| Step 19: Select the Source for a New Bond |
Top |
 We need to create a new bond in the product sketcher.
Begin by clicking on one end-point (source) for the new bond.
In this case, click on the Br atom.
We need to create a new bond in the product sketcher.
Begin by clicking on one end-point (source) for the new bond.
In this case, click on the Br atom.
|
| Step 20: Select Target for the New Bond |
Top |
 Complete the new bond by clicking on the other end-point (target) atom.
In this case, click on the carbo-cation.
Complete the new bond by clicking on the other end-point (target) atom.
In this case, click on the carbo-cation.
|
| Step 21: Select the (+) Formal Charge Modifier |
Top |
 Now that the basic bond structure in the product sketcher is correct, we need to correct
the formal charges in the diagram. This can be done by first selecting
the (+) Formal Charge Modifier tool.
Now that the basic bond structure in the product sketcher is correct, we need to correct
the formal charges in the diagram. This can be done by first selecting
the (+) Formal Charge Modifier tool.
(Alternatively, you can "Right-Click > Charge" the respective atoms,
or "Right-Click > Radical > Monovalent" for radical reactions.)
|
| Step 22: Apply the (+) Formal Charge Modifier |
Top |
 Click on the Br anion to neutralize the formal charge.
|
| Step 23: Select the (-) Formal Charge Modifier |
Top |
 Select the (-) Formal Charge Modifier tool. Again, an alternative
is to just "Right-Click > Charge" the respective atoms.
Select the (-) Formal Charge Modifier tool. Again, an alternative
is to just "Right-Click > Charge" the respective atoms.
|
| Step 24: Apply the (-) Formal Charge Modification |
Top |
 Click on the carbo-cation to neutralize the formal charge.
|
| Step 25: Apply the Mechanism Step to Generate Intermediates |
Top |
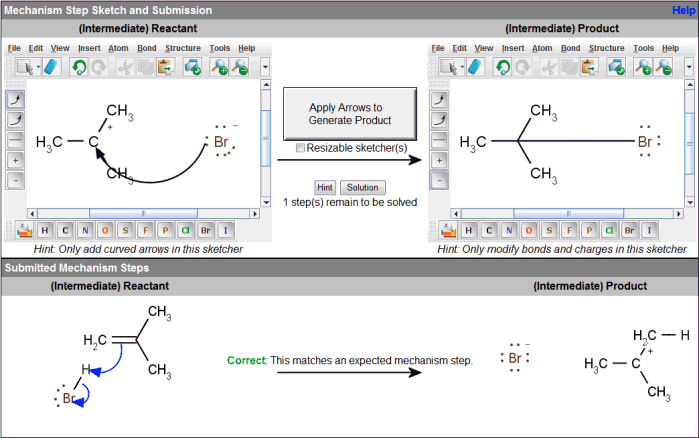 Click on the "Apply Arrows..." button to
submit your mechanism step diagram(s).
Click on the "Apply Arrows..." button to
submit your mechanism step diagram(s).
|
| Step 26: Review Final Submission and Results |
Top |
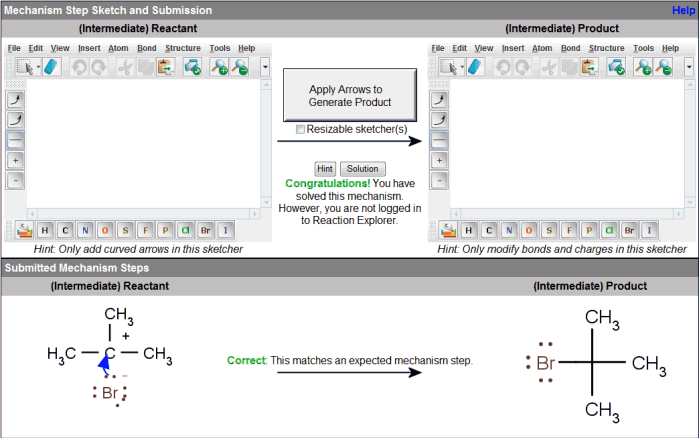 Once you have submitted all expected mechanism steps correctly,
the system will congratulate you on your success.
Once you have submitted all expected mechanism steps correctly,
the system will congratulate you on your success.
|
|